
Overview
The Datamars TracKing-1 reader (Bluetooth version) can communicate with the rCAPTURE mobile app wirelessly, using an Android mobile device with an operating system of 6.0.1 or higher, and the BluePiano Keyboard Wedge. This enables RFID tags to be read by the TracKing-1 reader and seamlessly transmitted to rCAPTURE with a single press of a button and without having to connect cables.
Before you start
We recommend to fully charge the battery before the first usage of the reader. To charge the battery, plug the USB cable into the corresponding connector on the bottom of the reader and connect it to a PC or a wall mount adapter with a USB plug.
![]()
Upon powering on the TracKing-1, the home screen is shown:
![]()
- EID counter: shows how many EIDs are stored in the last session selected.
- Session file: A memory file where the EIDs read are stored. The file is named with date and time at the
creation of the session. The home menu shows the name of the last session file selected.
Bluetooth Set-up Steps
Step 1:
Select the Settings Menu from the Home Screen:![]()
Step 2:
From the Settings menu, use the right arrow key to navigate to the Bluetooth option and press the ON button. The Bluetooth settings menu will open:![]()
Step 3:
When Bluetooth is switched on, the message Discoverable appears on the screen. The reader can now be found by your Android device:![]()
Step 4:
Use the right arrow key to move to the second menu option. Press the ON button repeatedly and the display will cycle through the Keyboard Wedge and COM Port profiles. Select the COM Port option: ![]()
Establishing the Bluetooth Connection with your Android Device
To connect the TracKing-1 to your Android device, the devices must first “discover” each other. This can be done from your Android, or from the TracKing-1.
Connection from TracKing-1:
- On the TracKing-1, use the right arrow key to move to the magnifying glass which is the third menu option in the Bluetooth menu. Select it using the ON button. Available Bluetooth devices will then be displayed (Figure 5). Use the down arrow key to highlight the desired device and press the ON button to select it.
- Your Android will then ask for permission to “pair” with the TracKing-1 and this permission should be given. A security PIN code may be entered in the Android to establish the connection. For this purpose, 3 possible PIN codes can be chosen, 0000, 1234, or 9999. To require no PIN, select the NONE option.
- To pair the TracKing-1 with the last Bluetooth device connected, select the AUTO icon.
- Upon successful connection, the message on the TracKing-1 display will change from Discoverable to Connected and the Bluetooth symbol at the top of the screen will change from white to green:

Connection from your Android device:
- On your Android device, go to Settings > Connections. Open your Android’s Bluetooth menu and search for the TracKing-1.
- When the TracKing-1 appears in the device list, select it and it will connect. Upon successful connection, the message on the TracKing-1 display in the Bluetooth menu will change from Discoverable to Connected and the Bluetooth symbol at the top of the screen will change from white to green.
- Exit the Bluetooth menu using the settings button and return to the home screen using the home button.
Establishing the Connection between TracKing1 and the BluePiano Keyboard Wedge.
If you already have BluePiano installed and configured, you can skip ahead to ‘Connecting the TracKing1 to BluePiano’ section. Otherwise, read on!
The BluePiano Keyboard Wedge is a soft-keyboard that enables rCAPTURE to capture and process data from external Bluetooth devices, like the TracKing1. The next series of steps show you how to set up and configure the BluePiano Keyboard Wedge to enable Electronic Identification (EID) tags to be read and seamlessly transmitted from the TracKing1 to rCAPTURE.
Setting up the BluePiano Keyboard Wedge
Go to Google Play and download the BluePiano Keyboard Wedge App. The app is free to use as a trial version but costs USD$19.95 for full use, which is recommended if you plan to make regular updates.

Upon your first time opening BluePiano, you will be prompted to set up the keyboard in three steps:
Step 1:
Tap Enable in Settings. On the next screen, turn on BluePiano.


Note: You will be presented with a security warning which must be confirmed during installation. This message is normal and reads something like this:

Don’t worry, this is a standard Android warning when using alternative input methods. The app does not log, store, or forward sensitive information.
Step 2
Tap Switch Input Methods, then select the English (US) Blue Piano Keyboard:


Step 3
Configure any additional languages (optional), then tap Finished.

Configuring the BluePiano Keyboard Wedge to work with rCAPTURE
Now you need to configure the app to work with rCAPTURE.
Step 1:
In the BluePiano app, tap Keyboard preferences. Scroll down and tap on Keyboard Behavior:


Step 2:
Tap Add Simulation Rule:

Note: You may be prompted to grant permissions (such as access to camera and contacts). You can do this now (recommended) or later; the app will keep prompting you periodically until you grant the permissions:

Step 3:
Tap on Name, then type rCAPTURE. Tap OK:


Step 4:
Tap on This simulation rule will be applied to, and in the subsequent list of apps, scroll down until you find rCAPTURE, and select it (it will be toward the very bottom of the list):


Step 5:
Tap on Tap on Prefix and suffix setting:

Step 6:
Move your cursor to the end of the text ${INPUT} and type | (the pipe character), with no spaces. Tap OK:


Step 7:
Tap SAVE RULE at the bottom:

Connecting the TracKing1 to BluePiano
Step 1:
Open the BluePiano App. In Keyboard Preferences, tap Configuration:


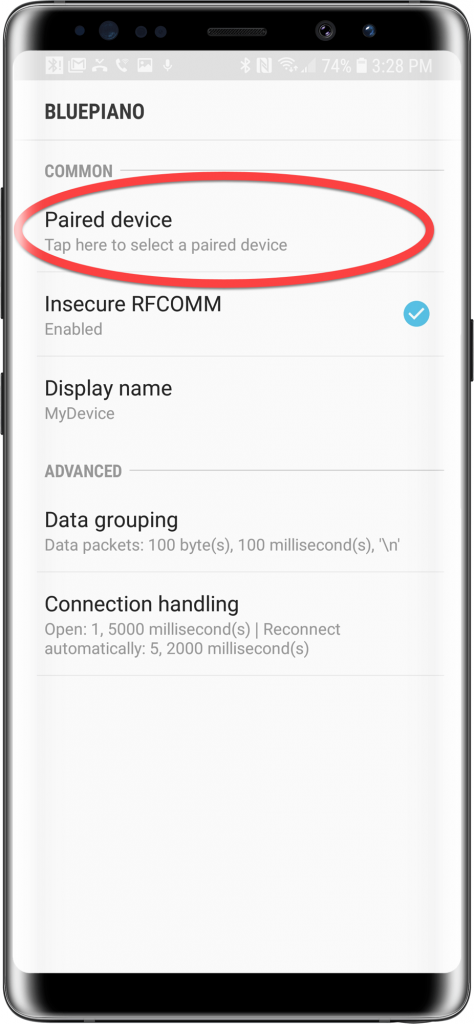
Step 2:
Tap Paired device, then select the TracKing1 reader from the list:

Step 3:
Now that you have your paired TracKing1 device set in BluePiano, tap Data grouping:

Step 4:
Ensure Data packets is Enabled and all associated values are checked, with the exception of the last one, Include delimiter; ensure this is unchecked and set to Delimeter is removed.


The reader will now be fully connected with your Android device, and the flashing indicator light on the reader should change to a solid illuminated state. If it continues to flash, open the rCAPTURE app to finalize the connection.
Transmitting Electronic Identification (EID) information to rCAPTURE
Step 1:
In rCAPTURE, on your desired form select whether you are performing a Single (1 animal) or Group (many animals) update:

Step 2:
Tap the Electronic ID(s) field. When you see the flashing cursor, you are ready to perform your scan:

Step 3:
On the TracKing1, we recommend you operate in Single Reading Mode. In single reading mode, each click of the ON button will start a reading session. After reading the tag, reading will turn OFF. Click ON before scanning the next tag. This will prevent other tags that are close by that are not intended to be scanned to be inadvertently captured, causing data integrity issues.![]()
Step 4:
On the TracKing 1, Press the ON button to start reading:
![]()
- When a tag is a successful read, the display will show the EID detected (see picture above). Ensure EID numbers are recorded as they appear on the tag with no additional characters included in the EID number.
- The reader can check for duplicates on the last 10, 100 or 1000 EIDs recorded. If duplicates are not allowed, an EID already stored in the session file won’t be recorded twice and the duplicate icon will be shown on the reader’s screen.
Step 5:
The Electronic ID Number will populate in rCAPTURE. For Group scans, each ID number must be separated by a | (pipe character) and will look like this:

It is very important that the EID numbers are recorded as they appear on the tag with no additional characters included in the EID number, and that each tag number is separated by a | pipe character. If this not the case, check your settings on the TracKing1, and on your Android device ensure you have BluePiano selected as your keyboard.
Continue to fill in the rest of the form as needed.
Troubleshooting Tip: If at any time your reader loses the Bluetooth connection with rCAPTURE, check that you still have BluePiano selected as your keyboard (you may need to unselect it and reselect it to re-establish the connection).